GitLab CI/CD パイプライン実行時エラーについて
前回GitLabをインストールしRunner登録までやりました。
今回は簡単なCI/CD パイプラインの実行をやってみたときに出くわしたエラーについて対処していきます。
エラーについて
This job is stuck because the project doesn't have any runners online assigned to it.
日本語だと
プロジェクトにオンラインで割り当てられたランナーがないため、このジョブはスタックしています。

原因と対処方法
原因
Runnerにはタグがありますが、ジョブにタグを設定せずに実行すると個のエラーとなるようです。
対処方法
詳細はこちらを参考ください。
簡単に説明します。
左バーの「Settings」>「CI/CD」>「Runner」へと進み、「Expand」をクリックし詳細画面を開きます。
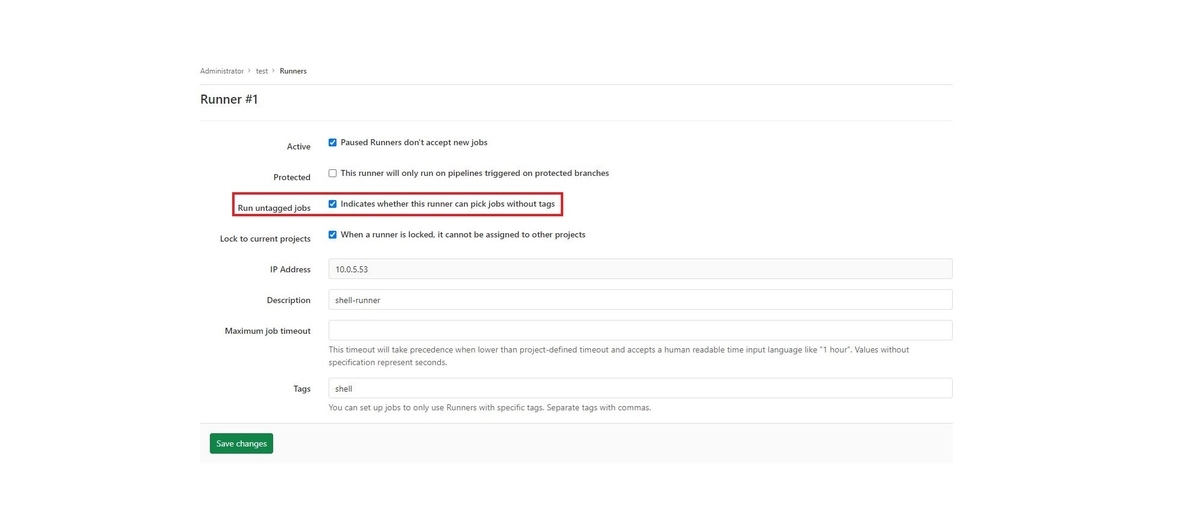
すると登録したRunner情報が表示されますので下記図のとおり鉛筆マークをクリックします。

鉛筆マークをクリック後、下記図のとおり「Run Untagged Jobs」にチェックマークを入れ「Save Changes」します。
以上で終わりです。
GitLab Runner登録手順
GitLabでCI/CDやるならRunnerは必須でしょ!
と言う事でRunner登録行ってみよ!
今回はRunnerをDockerで動かすためDockerのインストールも含めます。
Dockerのインストール
$ sudo yum install -y docker
$ sudo systemctl enable docker
$ sudo systemctl start docker
GitLab Runnerのインストール
$ sudo wget -O /usr/local/bin/gitlab-runner https://gitlab-runner-downloads.s3.amazonaws.com/latest/binaries/gitlab-runner-linux-amd64
$ sudo chmod +x /usr/local/bin/gitlab-runner
$ sudo useradd --comment 'GitLab Runner' --create-home gitlab-runner --shell /bin/bash
$ sudo /usr/local/bin/gitlab-runner install --user=gitlab-runner --working-directory=/home/gitlab-runner
$ sudo systemctl enable gitlab-runner
$ sudo systemctl start gitlab-runner
GitLab Runnerの登録

トークンの登録
トークン登録は一連の会話形式で登録します。下記にログ残します。
[root@root aws-terraform]# gitlab-runner register
Runtime platform                                    arch=amd64 os=linux pid=27105 revision=943fc252 version=13.7.0
Running in system-mode.

Enter the GitLab instance URL (for example, https://gitlab.com/):
http://192.168.250.52
Enter the registration token:
*******
Enter a description for the runner:
[root.*********.local]: shell-runner
Enter tags for the runner (comma-separated):
shell
Registering runner... succeeded                     runner=-xKw1Xmy
Enter an executor: docker+machine, docker-ssh+machine, kubernetes, custom, docker, parallels, shell, docker-ssh, ssh, virtualbox:
docker
Enter the default Docker image (for example, ruby:2.6):
hashicorp/terraform:latest
Runner registered successfully. Feel free to start it, but if it's running already the config should be automatically reloaded!
[root@root aws-terraform]#
Runner登録確認
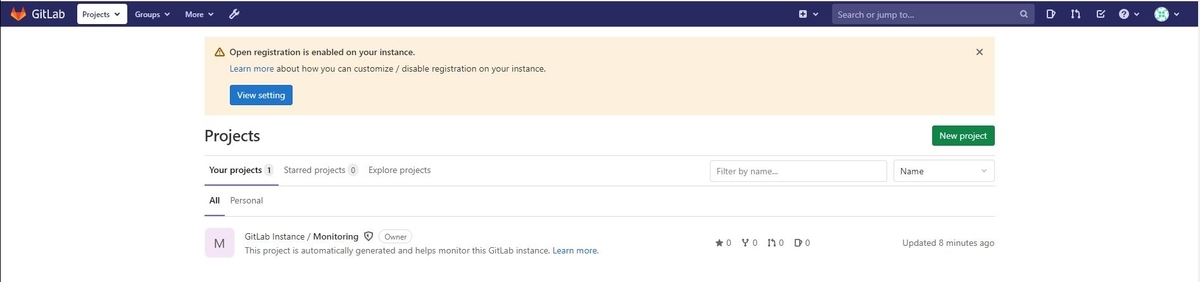
再度Runner画面を開き、Runnerが登録されていることを確認する。

CentOS7 にGitLabをインストールしてみる
OCIリソースの管理をTerraform+GitLabでコード管理とCI/CDをやりたくて今回はGitLabのインストールをやってみます。
インストールするのはOmnibus package版のGitLab です。
CentOS環境
CentOS Linux release 7.8.2003 (Core)
依存関係のインストールと設定
$ yum install -y policycoreutils-python
$ firewall-cmd --permanent --add-service=http
$ systemctl reload firewalld
$ yum install -y curl
$ yum install -y openssh-server openssh-clients
$ systemctl enable sshd
$ systemctl start sshd
$ yum install postfix
$ systemctl enable postfix
$ systemctl start postfix
リポジトリを追加
$ curl -sS https://packages.gitlab.com/install/repositories/gitlab/gitlab-ce/script.rpm.sh | sudo bash
ログインしてみる
本当は http://192.168.250.52 にアクセスするとパスワードの変更画面が先に出てくるのですが、スクショ取るの忘れちゃいました。。
パスワード設定後は下記のログイン画面へ遷移します。

問題なくログインできました。次はGitLab CI/CDやりたいですね!
Terraformで適当に AWS VPCを作ってみる
variables.tfを書いていこう!
provider "aws" {
  version = "~> 2.0"
  region  = "ap-northeast-1"
}
はい、次
main.tfを書くぞ!
resource "aws_vpc" "main" {
  cidr_block = "10.0.0.0/16"

  tags = {
    Name = "handson"
  }
}
シンプル イズ ベスト!!
お・わ・り
おまけ
[root@localhost aws]# terraform apply

An execution plan has been generated and is shown below.
Resource actions are indicated with the following symbols:
  + create

Terraform will perform the following actions:

  # aws_vpc.main will be created
  + resource "aws_vpc" "main" {
      + arn                              = (known after apply)
      + assign_generated_ipv6_cidr_block = false
      + cidr_block                       = "10.0.0.0/16"
      + default_network_acl_id           = (known after apply)
      + default_route_table_id           = (known after apply)
      + default_security_group_id        = (known after apply)
      + dhcp_options_id                  = (known after apply)
      + enable_classiclink               = (known after apply)
      + enable_classiclink_dns_support   = (known after apply)
      + enable_dns_hostnames             = (known after apply)
      + enable_dns_support               = true
      + id                               = (known after apply)
      + instance_tenancy                 = "default"
      + ipv6_association_id              = (known after apply)
      + ipv6_cidr_block                  = (known after apply)
      + main_route_table_id              = (known after apply)
      + owner_id                         = (known after apply)
      + tags                             = {
          + "Name" = "handson"
        }
    }

Plan: 1 to add, 0 to change, 0 to destroy.


Warning: Version constraints inside provider configuration blocks are deprecated

  on variables.tf line 2, in provider "aws":
   2:   version = "~> 2.0"

Terraform 0.13 and earlier allowed provider version constraints inside the
provider configuration block, but that is now deprecated and will be removed
in a future version of Terraform. To silence this warning, move the provider
version constraint into the required_providers block.

Do you want to perform these actions?
  Terraform will perform the actions described above.
  Only 'yes' will be accepted to approve.

  Enter a value: yes

aws_vpc.main: Creating...
aws_vpc.main: Creation complete after 2s [id=vpc-0207ab******5e4b]

Apply complete! Resources: 1 added, 0 changed, 0 destroyed.
[root@localhost aws]#
今更ながらCentOS7にAWS CLI入れてみる
公式ドキュメントを参照
AWS CLIのインストール
$ curl "https://awscli.amazonaws.com/awscli-exe-linux-x86_64.zip" -o "awscliv2.zip"
$ unzip awscliv2.zip
$ sudo ./aws/install
installすると下記出力となる
[root@localhost aws]# ./aws/install
You can now run: /usr/local/bin/aws --version
バージョン確認
[root@localhost aws]# aws --version
aws-cli/2.1.14 Python/3.7.3 Linux/3.10.0-1127.el7.x86_64 exe/x86_64.centos.7 prompt/off
はい。おしまい!
CentOS7.8にオラクルデータベース 19cをインストールしてみる
事前準備
Oracle本体のインストール
下記サイトよりオラクル19cのrpmをダウンロードし、インストールします。
※rpmのダウンロードにはオラクルアカウントと利用規約がありますのでご留意ください。
www.oracle.com
[root@localhost ~]# yum -y localinstall oracle-database-ee-19c-1.0-1.x86_64.rpm
Databaseの作成とconfigure実行
※メモリ1Gだとエラーで失敗する可能性あり
[root@localhost ~]# export ORACLE_BASE=/opt/oracle
[root@localhost ~]# export ORACLE_HOME=$ORACLE_BASE/product/19c/dbhome_1
[root@localhost ~]# export ORACLE_SID=ORCLCDB
[root@localhost ~]# /etc/init.d/oracledb_ORCLCDB-19c configure
ポート開放
[root@localhost ~]# firewall-cmd --permanent --add-port=1521/tcp
success
[root@localhost ~]# firewall-cmd --permanent --add-port=5500/tcp
success
[root@localhost ~]# firewall-cmd --reload
success
[root@localhost ~]#
sqlplusで接続するための事前準備と接続確認
[root@localhost ~]# su - oracle
最終ログイン: 2020/12/18 (金) 10:21:17 JST日時 pts/0
[oracle@localhost ~]$ export ORACLE_SID=ORCLCDB
[oracle@localhost ~]$ export ORACLE_BASE=/opt/oracle
[oracle@localhost ~]$ export ORACLE_HOME=$ORACLE_BASE/product/19c/dbhome_1
[oracle@localhost ~]$ export PATH=$PATH:$ORACLE_HOME/bin
[oracle@localhost ~]$ source ~/.bash_profile
[oracle@localhost ~]$ sqlplus / as sysdba

SQL*Plus: Release 19.0.0.0.0 - Production on Fri Dec 18 10:40:10 2020
Version 19.3.0.0.0

Copyright (c) 1982, 2019, Oracle.  All rights reserved.


Oracle Database 19c Enterprise Edition Release 19.0.0.0.0 - Production
Version 19.3.0.0.0
?????????
SQL> show pdbs;

    CON_ID CON_NAME                       OPEN MODE  RESTRICTED
---------- ------------------------------ ---------- ----------
         2 PDB$SEED                       READ ONLY  NO
         3 ORCLPDB1                       READ WRITE NO
SQL>
sys, system のパスワードを設定
文字化けしてる・・・
SQL> alter user sys identified by password1;

?????????????

SQL> alter user system identified by password2;

?????????????

SQL>
接続先DBの変更
今はCDBに接続している
SQL> show con_name

CON_NAME
------------------------------
CDB$ROOT
PDBに変更する
SQL> alter session set container = ORCLPDB1;
確認してみる
SQL> show con_name;

CON_NAME
------------------------------
ORCLPDB1
OK
TableSpaceとUser作成
SQL> CREATE TABLESPACE tbs_01 DATAFILE '/opt/oracle/oradata/ORCLCDB/ORCLPDB1/tbs_01.dbf' SIZE 10M AUTOEXTEND ON NEXT 500K MAXSIZE 100M;
SQL> CREATE TEMPORARY TABLESPACE tbs_temp_01 TEMPFILE '/opt/oracle/oradata/ORCLCDB/ORCLPDB1/tbs_temp_01.dbf' SIZE 5M AUTOEXTEND ON TABLESPACE GROUP tbs_grp01;
SQL> CREATE USER user01 IDENTIFIED BY password3 DEFAULT TABLESPACE tbs_01;
SQL> GRANT CONNECT TO user01;
SQL> GRANT RESOURCE TO user01;
sqlplusでログインしてみる
[oracle@localhost ~]$ sqlplus user01/password3@//localhost/ORCLPDB1

SQL*Plus: Release 19.0.0.0.0 - Production on Fri Dec 18 10:48:26 2020
Version 19.3.0.0.0

Copyright (c) 1982, 2019, Oracle.  All rights reserved.


Oracle Database 19c Enterprise Edition Release 19.0.0.0.0 - Production
Version 19.3.0.0.0
?????????
SQL>
Django練習
はじめに
Djangoの勉強をはじめました。最初はソースコードの写経をしていましたが原理を知らないまま写経をしても意味がないと思いとりあえず今日やった下記の操作を説明できるようになる事をまずは目標とします。
後日下記操作の意味を追記するようにしたいと思います。
プロジェクトの作成
$ django-admin startproject project2
アプリケーションの作成
$ python3.7 manage.py startup employee
Djangoの管理画面を利用する為マイグレートの実行
$ python3.7 manage.py migrate
スーパーユーザの作成
$ python3.7 manage.py createsuperuser
setting.pyの編集
project2ディレクトリ配下の「settings.py」を編集する。
編集箇所は2箇所
INSTALLED_APPS
INSTALLED_APPS = [
    'employee.apps.EmployeeConfig',  #この行を追加
    'django.contrib.admin',
    'django.contrib.auth',
    'django.contrib.contenttypes',
    'django.contrib.sessions',
    'django.contrib.messages',
    'django.contrib.staticfiles',
]
urls.pyの編集
path関数の追加
from django.urls import path
pathnの追加
urlpatterns = [
    path('admin/', admin.site.urls),
    path('', include('employee.urls'))
]
employeeディレクトリ配下に「urls.py」を作成
from django.urls import path,include
from . import views

app_name = 'employee'

urlpatterns = [
    path('',views.IndexViews.as_view(), name='index')
]
views.pyの編集
from django.views import generic

class IndexView(generic.TemplateView):
    template_name = 'employee/employee_list.html'
base.htmlの作成
プロジェクトディレクトリ「employee」配下に「templates」というディクトりを作成し、その配下に「employee」を作成します。
その後、下記内容で「base.html」を作成します。
<!doctype html>
<html lang="ja">
  <head>
    <title>社員管理システム</title>
    <!-- Required meta tags -->
    <meta charset="utf-8">
    <meta name="viewport" content="width=device-width, initial-scale=1, shrink-to-fit=no">

    <!-- Bootstrap CSS -->
    <link rel="stylesheet" href="https://maxcdn.bootstrapcdn.com/bootstrap/4.0.0-beta.2/css/bootstrap.min.css" integrity="sha384-PsH8R72JQ3SOdhVi3uxftmaW6Vc51MKb0q5P2rRUpPvrszuE4W1povHYgTpBfshb" crossorigin="anonymous">
  </head>
  <body>
      {% block content %}
      {% endblock %}
    </div>

    <!-- Optional JavaScript -->
    <!-- jQuery first, then Popper.js, then Bootstrap JS -->
    <script src="https://code.jquery.com/jquery-3.2.1.slim.min.js" integrity="sha384-KJ3o2DKtIkvYIK3UENzmM7KCkRr/rE9/Qpg6aAZGJwFDMVNA/GpGFF93hXpG5KkN" crossorigin="anonymous"></script>
    <script src="https://cdnjs.cloudflare.com/ajax/libs/popper.js/1.12.3/umd/popper.min.js" integrity="sha384-vFJXuSJphROIrBnz7yo7oB41mKfc8JzQZiCq4NCceLEaO4IHwicKwpJf9c9IpFgh" crossorigin="anonymous"></script>
    <script src="https://maxcdn.bootstrapcdn.com/bootstrap/4.0.0-beta.2/js/bootstrap.min.js" integrity="sha384-alpBpkh1PFOepccYVYDB4do5UnbKysX5WZXm3XxPqe5iKTfUKjNkCk9SaVuEZflJ" crossorigin="anonymous"></script>
  </body>
</html>
employee_list.htmlの作成
base.htmlと同階層に「employee_list.html」を下記内容で作成します。
{% extends 'employee/base.html' %}

{% block content %}
トップページ
{% endblock %}
Djangoの起動
$ python3.7 manage.py runserver 0.0.0.0:8000
エラーが・・
「Invalid HTTP_HOST header: '132.***.***.60:8000'. You may need to add '132.***.***.60' to ALLOWED_HOSTS.」
解決策
「settings.py」の「ALLOWED_HOSTS」に設定追加する。
ALLOWED_HOSTS = ['132.***.***.60']
問題なくアクセスできました。
[opc@django project2]$ curl http://132.145.122.60:8000/
<!doctype html>
<html lang="ja">
  <head>
    <title>社員管理システム</title>
    <!-- Required meta tags -->
    <meta charset="utf-8">
    <meta name="viewport" content="width=device-width, initial-scale=1, shrink-to-fit=no">

    <!-- Bootstrap CSS -->
    <link rel="stylesheet" href="https://maxcdn.bootstrapcdn.com/bootstrap/4.0.0-beta.2/css/bootstrap.min.css" integrity="sha384-PsH8R72JQ3SOdhVi3uxftmaW6Vc51MKb0q5P2rRUpPvrszuE4W1povHYgTpBfshb" crossorigin="anonymous">
  </head>
  <body>

トップページ

    </div>

    <!-- Optional JavaScript -->
    <!-- jQuery first, then Popper.js, then Bootstrap JS -->
    <script src="https://code.jquery.com/jquery-3.2.1.slim.min.js" integrity="sha384-KJ3o2DKtIkvYIK3UENzmM7KCkRr/rE9/Qpg6aAZGJwFDMVNA/GpGFF93hXpG5KkN" crossorigin="anonymous"></script>
    <script src="https://cdnjs.cloudflare.com/ajax/libs/popper.js/1.12.3/umd/popper.min.js" integrity="sha384-vFJXuSJphROIrBnz7yo7oB41mKfc8JzQZiCq4NCceLEaO4IHwicKwpJf9c9IpFgh" crossorigin="anonymous"></script>
    <script src="https://maxcdn.bootstrapcdn.com/bootstrap/4.0.0-beta.2/js/bootstrap.min.js" integrity="sha384-alpBpkh1PFOepccYVYDB4do5UnbKysX5WZXm3XxPqe5iKTfUKjNkCk9SaVuEZflJ" crossorigin="anonymous"></script>
  </body>
</html>[opc@django project2]$